Using your own mail server for sending surveys


It is possible to set your own SMTP server for sending your surveys instead of using our distributed mailing cloud. The advantage is that the email headers include your personal sender mail. But please consider the following limitations:

  • Your mail server should be suited to send the amount of survey emails required. Free email accounts, e.g. from Yahoo or Google often limit the amount of allowed emails per day and are not suited for sending large amounts.
  • Some recipients might mark the survey email as spam, which can result in a temporary blacklisting if a notable number of spam reports are registered for your server. We recommend to not use the same server (IP) used for your internal company mail.

The following guide instructs how to switch from our mailing cloud to your own server:

1
Open your Account Settings

In the top navigation bar click on your email address. A dropdown menu will open, click on "Settings".

In the "Mail Server" select box switch from "Use only Callexa servers" to "Use only my own server".


2
Parameteres for SMTP Authentication

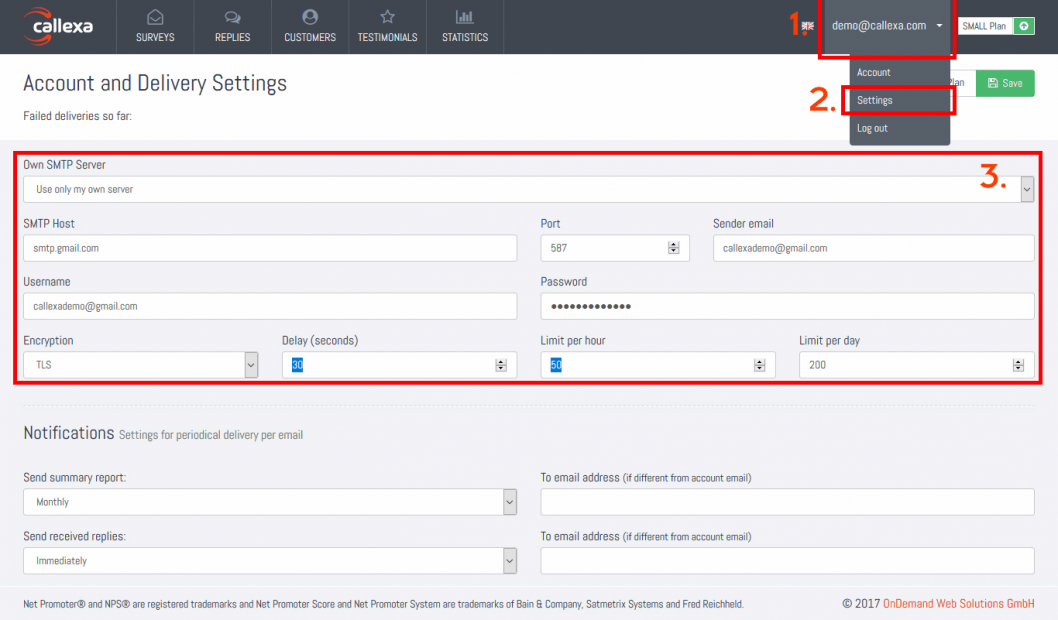
The following parameters are required:

  • SMTP Host
    The server domain name, e.g. "smtp.gmail.com"
  • Port
    The port number of the server, depending on the encryption used. Typical ports are 25 (unencrypted), 465 (SSL encryption), 587 (TLS encryption).
  • Sender Email
    Typically the main email address of the used SMTP account
  • Username
    Often the same as the sender email, but sometimes a dedicated username
  • Password
    Your SMTP account password. For future changes you can leave this field empty to leave the password unchanged
  • Encryption
    Most SMTP servers nowadays use TLS encryption, often relates to the port used.
  • Delay / Limits
    You can throttle sending of emails with reasonable limits. Delay is the time to wait between sending 2 emails. Most free SMTP servers have very restrictive limits, please search for the appropriate values for your provider.

Hit the "Save" button to continue.

3
Validate ownership

Once saved a red message should appear:

A test mail was sent using your server configuration to the address configured as "Sender Email" and contains a confirmation link. Please login to your email account, check for that email and click the link to activate the new server configuration. A green message will appear, confirming that the server configuration is now active.

In case of failure, the original failure message as received by the configured server is displayed.


Was this article helpful?
No Yes
We use cookies for the technical functionality of this website. With your consent, we also collect page views and other statistical data in anonymized form.

Select individually
Cookie Settings
Read Privacy Statement