Already have a Callexa account? Continue with Step 2.
Log in to your Bigcommerce Account and navigate to the Apps > Marketplace entry in the sidebar. Search for "Callexa" and open the found entry or click here. Now click "Install" and your Callexa Feedback account will be created and the app added to your Bigcommerce store.
From now on you can access Callexa Feedback whenever you want by navigating to Apps > Callexa Feedback in your Bigcommerce Sidebar.
Note: Installing the app for Bigcommerce is non-binding and free of charge. Give it a try and if you are not happy just uninstall it (but please leave us a note on why).

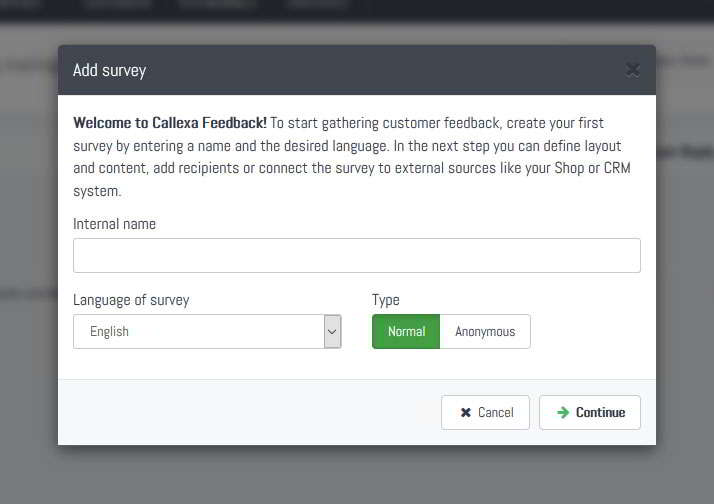
When you open the App for the first time account you are prompted to create your first survey. Just define an internal name, which will not be visible to your customers, set the language and submit.
On the next page customize your survey's layout, text blocks and follow-up questions. You can change all those settings at any time in the future. Read the "How can I create and customize a survey?" guide for more information.
Surveys can have different sources for recipients. You can manually add emails addresses, import CSV files, use Website Widgets and so on. You can also create several surveys for different purposes. That is why the Bigcommerce integration is not active by default. To activate it for the survey you just created, navigate to the "Integrations" tab, look for the Bigcommerce card and click "Activate".
If you have NOT installed the Callexa app through the Bigcommerce marketplace as outlined in step 1, you will have to set up API access manually. A dialog with the neccessary information will appear. Follow the instructions and click "Continue".
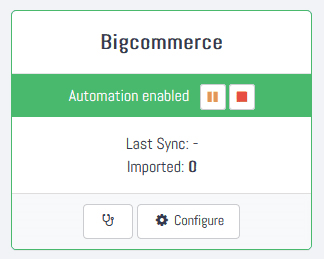
You are almost done. If activation was successful the integration card will appear in yellow and you can configure the send delay. Whenever you set an order to shipped the corresponding customer is added to the recipients queue shortly after. In most cases you want to ask for your customer's opinion about the order process AND the shipped items. So set a reasonable delay considering your average delivery time plus a few days.
Save the settings and click the "Play" button to start the automation.
Actually yes. If the integration card is highlighted in green, from now on recipients will be added automatically and surveys are sent with the scheduled delay.
We recommend you to test drive your survey with an email address of your own. Check the "How can I add recipients manually?" guide for instructions.
Otherwise, you are all done. Just follow your usual routine at Bigcommerce and wait for the first responses to come in.
From now on if an order in Bigcommerce is changed to state "Shipped", the customer's email address is added to the survey's recipients list a few minutes later with the scheduled sending delay as configured in Step 4. Sending will automatically occur as soon as the scheduled date is reached.
Note: Orders shipped prior to activating the automation will not be imported. Only orders changing their state while the automation is enabled are detected. To manually import your Bigcommerce customers, please use the "Customers > Export" function in your store dashboard and chose "Export to Microsoft Excel (CSV)". Then follow the guide "Manually adding Recipients" to the CSV file into your survey.
While many people consider Net Promoter Score® surveys to be a simple rating scale from 0 to 10, in reality NPS® has two sides - the quantitative (the rating) and the qualitative (the feedback) side. Just as an unanswered email is frustrating for the average user, there are few things that discourage a customer satisfaction professional more than an NPS survey that was only given a rating but no qualitative feedback.
Unlock the full potential of NPS surveys by tailoring them to your unique business needs. Learn how customization, integration with CRM, and actionable insights can transform customer feedback into growth opportunities.
Team collaboration, client feedback, and task management designed for web projects. Your clients report issues by making annotations right from the site being worked on. BugHerd turns these into full bug reports with all the info you need to fix the problem.
The customer survey via Net Promoter Score® has the advantage over other forms of survey in that you receive relevant customer feedback promptly when you need it most.
The title of the blog article poses an exciting question that all companies should ask themselves that want to survey their B2B customers with the Net Promoter Score in order to receive feedback.
The new Callexa Feedback is slimmer, faster and clearer than its predecessor. The focus was set on a structural update that puts Callexa on a more robust footing. The main focus here is on the optimization of user management, data processing and data connection of external systems. The process has changed noticeably, especially in the area of survey-making and the replies.
Discover how Callexa NPS and feedback loops can transform your business by enhancing customer loyalty and driving growth through real-time insights and continuous improvement.
Discover how to automate NPS surveys in your tech stack with our step-by-step guide. Enhance customer feedback and loyalty effortlessly!
Discover how to enhance customer loyalty by integrating NPS feedback seamlessly into your business systems for real-time insights and continuous improvement. Learn the steps to create an effective NPS feedback loop in our latest article.