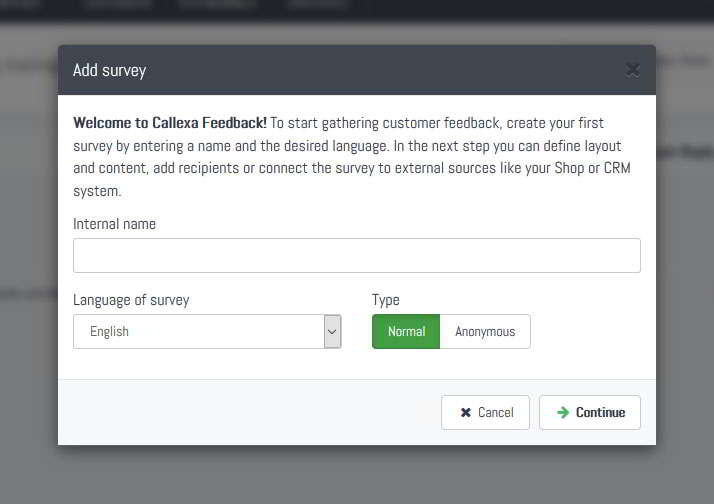
When you first log into your fresh Callexa account you are prompted to create your first survey. Just define an internal name (not visible to your customers), set the language and submit.
On the next page customize your survey's layout, text blocks and follow-up questions. You can change all those settings at any time in the future. Read the guide "How can I create and customize a survey?" for more information.
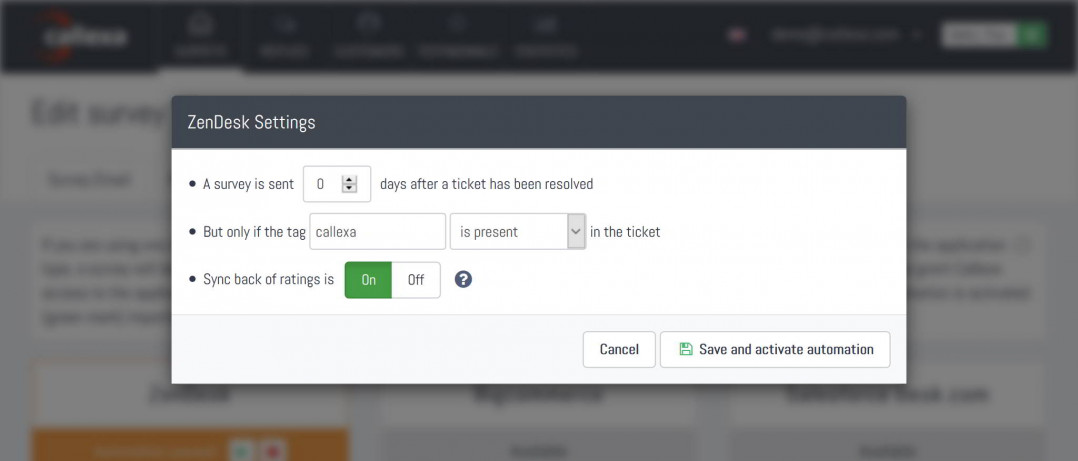
Now click the "Integrations" tab of your survey, look for the ZenDesk card and click "Activate". A dialog will appear asking for your ZenDesk domain name. Enter it and hit continue. You will be redirected to ZenDesk and asked for authorization of Callexa. This must be granted only once.
Note: Callexa will only read the ID and resolve date of a ticket, as well as the email address and full name of the assigned customer. We do not store or process any other content from your ZenDesk account.
You are almost done. If activation was successful, you are prompted to specify further import settings. Callexa checks for newly resolved tickets every hour and adds the corresponding customers to the recipients queue of your survey. You can specify a delay for scheduled sending if you do not want to survey your customers immediately after the ticket has been resolved.
You can also define a tag that has to be present or should not be present in your Zendesk customer or ticket entry in order to send a survey through Callexa. For example, if you want to control surveying from within Zendesk, define a tag like e.g. "survey" and set "is present". Now in the future add that tag to the ticket BEFORE setting it to resolved. All tickets not having this tag will then be ignored by Callexa.
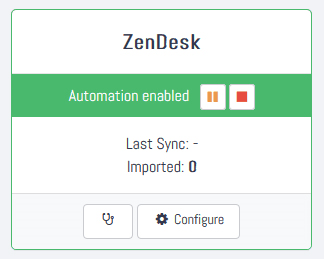
Actually yes. If the integration card is highlighted in green, from now on recipients will be added automatically and surveys are sent with the scheduled delay.
We recommend you to test drive your survey with an email address of your own. Check the "How can I add recipients manually?" guide for instructions.
Otherwise, you are all done. Just follow your usual routine at Zendesk and wait for the first responses to come in.
The customer survey via Net Promoter Score® has the advantage over other forms of survey in that you receive relevant customer feedback promptly when you need it most.
Discover how Callexa transforms customer feedback into actionable insights, enhancing satisfaction and driving business success. Learn more about its real-time feedback capabilities and data-driven solutions!
Discover how Callexa NPS and feedback loops can transform your business by enhancing customer loyalty and driving growth through real-time insights and continuous improvement.
Team collaboration, client feedback, and task management designed for web projects. Your clients report issues by making annotations right from the site being worked on. BugHerd turns these into full bug reports with all the info you need to fix the problem.
With Callexa Fedback, you can send customer satisfaction surveys with the NPS system. The actual sending of the NPS survey is relatively easy thanks to Callexa feedback. However, if the survey is sent at the wrong time, this can have a negative impact on the ratings.
While many people consider Net Promoter Score® surveys to be a simple rating scale from 0 to 10, in reality NPS® has two sides - the quantitative (the rating) and the qualitative (the feedback) side. Just as an unanswered email is frustrating for the average user, there are few things that discourage a customer satisfaction professional more than an NPS survey that was only given a rating but no qualitative feedback.
Collecting customer feedback is essential to building a profitable business. The background is explained quite simply. Because if you don't know what your customers think of your brand or products, you don't know when you're falling short of expectations and requirements. At the same time, you don't know why certain customers are happy with your company, nor who those customers are.
With a Net Promoter Score survey, you receive a variety of values that provide the status of your company, a product, or the quality of your support team. The NPS survey also shows you which of your customers are satisfied with your service, who is an enthusiastic supporter of your brand, and who did not like your services. But how do you use these values? What actions are you taking with each customer?
The Net Promoter Score® is a valuable metric to track and observe customer feedback. Once deployed, it can provide valuable insights into how customers feel about your product or business and what changes and improvements they would like to see. Over time, this metric can become the valuable tool you didn't know you needed.